Is your VPN leaking? Read our 2026 guide on how to tell if VPN is leaking, run an online DNS leak test, block WebRTC bypass, and disable IPv6 leaks.
⚡ Quick Guide: How to Test and Fix VPN Leaks
If you want to ensure that your VPN is protecting your privacy in 2026, keep these 3 essential diagnostics and fixes in mind:
-
Perform a Dual-Test Check: Connect your VPN and visit
ipleak.netordnsleaktest.com(run the Extended Test). If you see any DNS server belonging to your real internet service provider (ISP), or if your real physical country flag appears, your connection is actively leaking. -
Prevent DNS & IPv6 Leaks: In your VPN settings, turn on DNS Leak Protection, IPv6 Leak Protection, and enable the system-level Kill Switch. If your VPN doesn't support IPv6, manually disable IPv6 in your Windows or macOS network adapter properties to close the dual-stack loophole.
-
Block Browser WebRTC Leaks: WebRTC bypasses your VPN virtual network card to query your physical card directly. To fix this:
-
Firefox: Go to
about:configand setmedia.peerconnection.enabledtofalse. -
Chrome/Edge: Install uBlock Origin, open settings, and check "Prevent WebRTC from leaking local IP addresses".
-
Read our detailed guide below to explore the physics of SMHNR race conditions, step-by-step terminal command diagnostics, and complete manual configuration fixes.
Why in 2026, a VPN simply showing "Connected" is still not secure
If you want to know how to run a VPN leak test that goes beyond basic green-button indicators, you must analyze the underlying protocols.
Many users hold a common misconception about VPNs: "As long as the toggle on the client turns green and shows 'Connected', or a small key icon appears in the notification bar, I am absolutely safe."
In the early days of the internet, this simple tunneling encryption might have been enough to handle most basic privacy threats. However, in 2026, the network protocols of modern browsers and operating systems have become extremely complex and intelligent. While this modern network architecture delivers peak performance, it also introduces unprecedented security vulnerabilities to traditional VPNs. The following three major technical evolutions have completely shattered the illusion of "Connected means Secure":
1. Multi-homing & Complex Routing
Modern devices (especially smartphones and 2-in-1 laptops) no longer operate on a simple "one-device, one-connection" model. Instead, they typically connect to multiple network interfaces simultaneously:
-
IPv4 and IPv6 Dual-Stack Coexistence: With global IPv6 deployment reaching historic highs in 2026, many ISPs and cloud service providers now prioritize IPv6 communication by default. If a VPN client lacks robust IPv6 traffic interception and redirection mechanisms (or only supports traditional IPv4 tunneling), the operating system will automatically transmit IPv6 data packets through unencrypted physical network cards, resulting in a severe "Dual-Stack Leak."
-
Multipath & Cellular Fallback: To ensure "seamless network handoffs," modern operating systems automatically enable cellular networks (5G/6G) for concurrent data transmission when Wi-Fi signals weaken. This low-level multiplexing technology can easily cause "stray traffic" that has not bypassed the VPN virtual network card to run completely exposed, leaking your true physical IP.
2. High-Performance Web Standards (WebRTC & WebTransport)
To support lower latency in online gaming, virtual reality, high-definition video conferencing, and live streaming, modern browsers heavily rely on communication technologies like WebRTC (Web Real-Time Communication) and WebTransport (HTTP/3-based transport). These protocols bypass standard browser HTTP proxy settings at a fundamental level. They actively query and broadcast your device's actual network interface addresses to establish peer-to-peer (P2P) connections, creating a bypass channel that easily punctures VPN defenses.
3. Smart DNS Resolution & Parallel Queries
Modern operating systems and browsers utilize parallel DNS querying mechanisms to speed up web page loading. They send DNS resolution requests to multiple configured DNS servers at the same time and adopt whichever response arrives fastest. If your VPN is not configured with system-level global hijack/hook interception, your local ISP's DNS servers may resolve the domain name faster than the VPN's secure DNS, leaking your browsing history and approximate geographic location to your local ISP.
Therefore, "Connected" is merely the starting point of encryption, not a guarantee of security. This article will guide you step-by-step through a comprehensive leak test using the standard testing procedures of 2026. This will ensure that your digital identity is completely hidden.
DNS Leaks — Silent Privacy Exposure and Security Risks
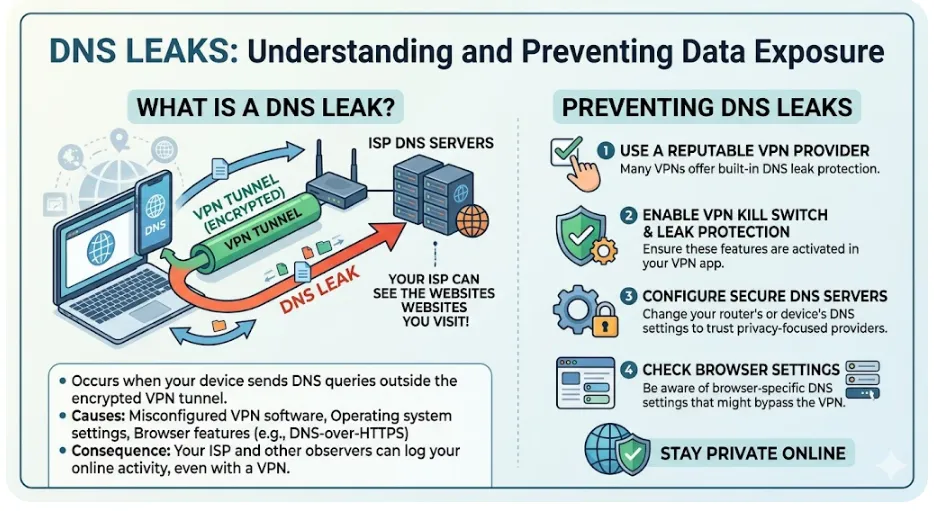
In the realm of cybersecurity and personal privacy protection, a DNS Leak is an extremely stealthy yet highly damaging security vulnerability. Many users assume that turning on a VPN guarantees complete peace of mind, unaware that their digital footprints are already being quietly exposed at the underlying system level.
I. What is a DNS Leak?
1. Basic Concept: DNS is the "Phone Book" of the Internet
When you type google.com or github.com into your browser, your computer cannot directly understand these English characters. It must first send a query request to a DNS (Domain Name System) server, asking: "What is the IP address of this domain?" Only after receiving a response like 142.250.190.46 can your device establish a connection.
2. Normal and Secure VPN Connection
In a well-configured and secure VPN connection, all network traffic (including DNS query requests) should be forcibly packaged and sent through an encrypted tunnel established by the VPN client to private, anonymous DNS servers provided by the VPN service provider.
-
Result: Your local Internet Service Provider (ISP, such as Comcast, AT&T, China Telecom, etc.) can only see that you have sent encrypted data to an encrypted VPN server, and has no way of knowing which specific websites you are visiting.
3. Connection Under a DNS Leak
A DNS leak occurs when, despite being connected to a VPN and having your regular web browsing data (HTTP/HTTPS traffic) successfully routed through the encrypted tunnel, your operating system bypasses this encrypted tunnel due to underlying routing mechanism bugs, configuration conflicts, or dual-stack (IPv4/IPv6) issues, and sends domain name queries (usually in plain text) directly to your local ISP's default DNS servers.
-
Result: Although the content of the transmitted data is encrypted, the list of websites you have visited (domain history) is fully visible in your ISP's server logs.
II. Comparison of Network Connection Flows
We can visually understand the differences in traffic paths between a secure connection and a leaking connection through the following comparison:
【 Normal and Secure VPN Connection 】
Your Device ---> [ Encrypted VPN Tunnel ] ---> Private VPN DNS Server ---> Get IP
(ISP cannot know what you visited)
【 Connection Under a DNS Leak 】
Your Device ---> [ Encrypted VPN Tunnel ] ---> Access Website Content (Content is encrypted, BUT...)
└----------> [ Plaintext Bypassing Tunnel ] ---> Local ISP DNS Server ---> Query Domain (ISP logs all visited URLs!)
III. Deep Threats of DNS Leaks
The most fatal aspect of a DNS leak is its stealthiness. Learning how to tell if VPN is leaking your metadata is critical, as a leaking connection completely strips your anonymity. For average users, web pages still open normally, and the VPN software indicates "Connected," but the underlying privacy protection is already full of holes:
-
Complete Exposure of Browsing History (Zero Privacy) Even if your specific traffic content is encrypted using high-strength VPN algorithms, your ISP (or any malicious attacker capable of monitoring/hijacking your local network traffic) can still clearly reconstruct what websites you visited and at what times by analyzing DNS query logs. Using this metadata, they can conduct precise user profiling and behavioral tracking.
-
DNS Poisoning, Hijacking, and Censorship Because DNS requests in a leaking state do not pass through the encrypted tunnel and are directly exposed to the public network or local ISP, censors or Man-in-the-Middle (MITM) attackers can easily tamper with your query results (known as DNS poisoning/DNS hijacking).
-
Phishing Attacks: Resolving the bank or social media website you are trying to visit to a fake phishing page created by hackers.
-
Content Blocking: Resolving target websites to non-existent IPs (such as 0.0.0.0), causing the page to show a "connection timeout" and enforcing internet censorship.
-
Bypass Localization & Real Geographic Location Exposure DNS queries typically select the server physically closest to your location. Through leaked local DNS server IPs, third-party websites or ad trackers can infer your actual province, city, or even approximate neighborhood, rendering the "virtual location" protection provided by your VPN useless.
IV. Why Do DNS Leaks Occur? (Technical Causes)
Understanding the causes of leaks helps us implement targeted defenses. Below are the common underlying reasons for DNS leaks:
-
OS Smart Resolution Mechanisms (e.g., Windows Smart Multi-Homed Name Resolution - SMHNR) In Windows 8 and above, to speed up domain resolution, the system concurrently sends DNS requests to all network adapters (including physical adapters and VPN virtual adapters) and prioritizes whichever result returns fastest. This often allows the local ISP's DNS request via the physical adapter to win the race, resulting in a leak.
-
IPv6 Traffic Unhandled by VPN Proxies Many VPNs only support IPv4 encryption. When your network environment supports IPv6 and the website you are visiting has an IPv6 address, the operating system will send IPv6 DNS queries directly to your local ISP via the physical adapter's IPv6 channel, causing an "IPv6 DNS leak."
-
Improper Static DNS Manually Configured If a user has manually assigned local ISP DNS servers in their network adapter properties, or if a router hardcodes specific DNS servers, the VPN client might fail to correctly override these underlying settings when taking over the network.
-
DHCP Lease Renewals and Routing Table Disruption During complex public Wi-Fi handovers or network reconnections, routing tables may experience temporary or persistent anomalies, causing the default route for DNS to point away from the VPN's virtual gateway.
V. How to Detect and Prevent DNS Leaks
1. How to Detect DNS Leaks?
Method A: Use Online Professional Detection Tools
Using an advanced DNS leak test online allows you to perform deep query analysis to see if your local ISP DNS servers are active. This is the simplest and most intuitive method:
-
Disconnect your VPN, visit dnsleaktest.com or browserleaks.com/dns, and write down the DNS servers displayed (typically your local ISP servers in your current city).
-
Connect your VPN, refresh the page, or click Standard Test / Extended Test.
-
Evaluation Criteria:
-
Secure: The test results show only servers provided by your VPN provider, and the country/region has changed to that of your VPN node.
-
Leaking: Your local ISP's server name, or servers located in your actual physical country, still appear in the test results.
Method B: Manual Detection via Terminal/Command Line (Windows Example)
After connecting to your VPN, open the Command Prompt (CMD) and type:
nslookup whoami.akamai.net
This command will return the IP of the DNS server currently resolving queries for you. Compare this IP to see if it belongs to your local ISP. If it does, a leak is present.
2. How to Prevent and Remedy DNS Leaks?
To ensure complete protection, it is recommended to apply a combination of the following defensive configurations:
Solution 1: Enable the VPN Client's Built-In Protection (Preferred)
Premium VPN clients typically provide dedicated leak prevention features. Make sure to turn them on in the settings:
-
Enable DNS Leak Protection.
-
Enable IPv6 Leak Protection (or directly disable IPv6 traffic inside the VPN settings).
-
Turn on the Kill Switch: If the VPN connection drops unexpectedly, it instantly blocks all internet traffic on the device to prevent plain-text requests from leaking out.
Solution 2: Disable IPv6 in the Operating System (If the VPN doesn't support IPv6)
If your VPN cannot fully manage IPv6 traffic:
-
Windows: Control Panel -> Network and Sharing Center -> Change adapter settings -> Right-click your physical network adapter (Wi-Fi or Ethernet) -> Properties -> Uncheck "Internet Protocol Version 6 (TCP/IPv6)" -> Click OK.
-
macOS: System Settings -> Network -> Select your active network -> Details -> TCP/IP -> Set "Configure IPv6" to "Link-local only" or "Off".
Solution 3: Manually Assign Secure, Neutral Public DNS
Avoid using DNS automatically assigned by your ISP. You can manually change the DNS settings on your physical adapter to secure, anti-pollution public DNS, such as:
-
Cloudflare: 1.1.1.1 / 1.0.0.1
-
Google Public DNS: 8.8.8.8 / 8.8.4.4
-
Quad9: 9.9.9.9
Solution 4: Enable DNS over HTTPS (DoH) in Your Browser
In the security settings of Chrome, Edge, or Firefox, enable "Use secure DNS." This encrypts and routes your DNS queries through a secure HTTPS tunnel directly to a trusted third-party resolver (like Cloudflare), effectively eliminating OS-level plain-text DNS leaks from the browser application layer.
WebRTC Leaks — The Browser's "Betrayal"
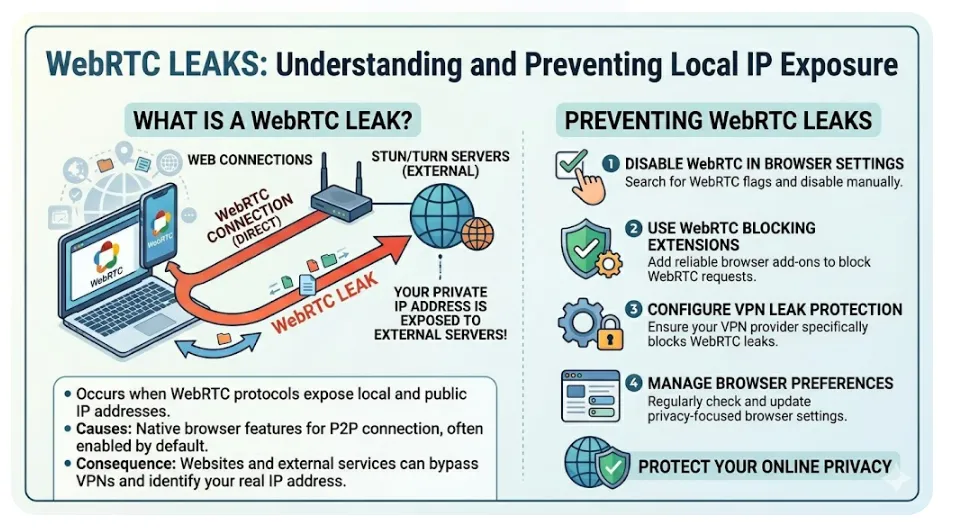
In the modern chess match of cybersecurity and privacy protection, Virtual Private Networks (VPNs) and proxy services are widely utilized to conceal users' real IP addresses. However, even if you have active top-tier encrypted tunnels, a native technology running at the lowest layer of your browser might be quietly handing over your true network identity. This phenomenon is known as the browser's "betrayal" — WebRTC Leaks.
I. What is WebRTC?
WebRTC (Web Real-Time Communication) is an open-source project and technology standard jointly championed by major browser vendors like Google, Mozilla, and Opera, and formally incorporated into the W3C standards.
1. Core Technology and Design Intent
The primary objective of WebRTC is to enable web browsers to perform real-time, high-quality, and low-latency voice calls, video chats, and peer-to-peer (P2P) data sharing.
-
No Plugins Required: Prior to the birth of WebRTC, real-time audio and video communications on web browsers heavily relied on Flash, ActiveX, or third-party proprietary plugins (such as early Skype Web plugins). WebRTC integrated these capabilities directly into the browser engine, allowing developers to invoke them using simple JavaScript APIs.
-
P2P (Peer-to-Peer) Architecture: Unlike the traditional Client-Server model, WebRTC encourages data to transfer directly between two browser nodes (Peers). This dramatically alleviates the bandwidth pressure on centralized servers and minimizes network latency.
2. Main Application Scenarios
-
Web Video Conferencing: Google Meet, Zoom Web, Microsoft Teams Web.
-
Instant Messaging & Collaboration: Discord, Slack, WeChat Web, Feishu/Lark Web.
-
Online Multiplayer Games: Leveraging its low-latency data channel (DataChannel) to enable direct player-to-player matchmaking.
-
P2P File Sharing: Tools like WebTorrent, which allow sharing large files directly via the browser.
II. Why Do WebRTC Leaks Occur?
To understand the essence of a WebRTC leak, we need to dissect the technical details of how it establishes P2P connections under complex network environments.
1. NAT Traversal and STUN/TURN Protocols
In the real world, the vast majority of user devices operate behind local area networks (NAT, Network Address Translation) and lack a public IP address directly exposed to the internet. For two browsers located in different local networks to establish direct peer-to-peer communication, WebRTC must first "see" the actual network landscape of both sides.
To resolve this obstacle, WebRTC relies on a suite of protocols:
-
STUN (Session Traversal Utilities for NAT): STUN servers are deployed on the public network and act as a mirror. When a browser sends a request to a STUN server, the server responds: "I see your request coming from this specific public IP and port." This allows the browser to discover its own true public IP address.
-
TURN (Traversal Using Relays around NAT): If the NAT types of both users are extremely strict (such as symmetric NAT), preventing a direct P2P connection, WebRTC falls back to relaying traffic through a public TURN server. Although this lapses into a server-relay model, the initialization phase still attempts to gather local details via STUN.
-
ICE (Interactive Connectivity Establishment): This is the framework responsible for gathering local candidate addresses (Host), reflexive addresses obtained via STUN (Reflexive), and TURN candidate addresses, systematically testing them to find the optimal communication pathway.
2. The Browser's "Super Privileges" and VPN Failures
Frighteningly, WebRTC's IP-gathering mechanism is executed at the lowest layer of the browser, granting it incredibly high execution priority.
In many scenarios, even when a system-wide VPN (or a proxy utilizing a virtual network card interface) is active, the browser's WebRTC module will prioritize finding the fastest, lowest-latency route. When collecting ICE candidates, it can completely bypass the operating system's virtual network card routing table, query the local physical network adapter directly, and send out UDP requests to public STUN servers. This behavior breaks through the virtual network tunnel, exposing details assigned by your Internet Service Provider (ISP):
-
Your real public IPv4 / IPv6 addresses.
-
Your private IP addresses inside your local area network (e.g., 192.168.1.X or 10.X.X.X).
Because this request and subsequent "reporting" are performed directly by the browser to the target website, the VPN's encryption tunnel is bypassed before the data even leaves the browser, rendering the VPN virtually powerless to stop it.
III. Network Data Flow Comparison (Schematic Diagram)
The flowchart below visually demonstrates the difference in routing paths between standard VPN traffic and leaked WebRTC traffic when a target website runs WebRTC detection scripts:
Target Website (Running malicious or compliant WebRTC probe scripts)
│
├─► [Via VPN Encrypted Tunnel] ──► Target Website acquires ──► VPN Node IP (Privacy spoofing successful, real IP protected)
│
└─► [Via WebRTC JavaScript API] ──► Bypasses VPN Tunnel ──► Extracts physical network card's real public IP! (Privacy leak)
Detailed Steps Breakdown:
-
Normal Web Access: The user's browser routes HTTP/HTTPS requests encrypted through the system's virtual network card to the VPN server, which forwards them to the target website. The target website's web logs see only the VPN server's IP.
-
WebRTC Script Activation: The target website loads a piece of legitimate JavaScript code that invokes the browser's native RTCPeerConnection API.
-
Bypassing the Tunnel: Upon receiving the API call, the browser's underlying C++ engine bypasses application-layer proxy settings, directly utilizing the system's physical network adapter to send a STUN (UDP) binding request.
-
IP Exposure: The STUN server returns the browser's true public IP (assigned by the real ISP). Using the JavaScript onicecandidate callback function, the browser packages the acquired real public and private IPs into SDP (Session Description Protocol) payloads.
-
Covert Collection: The website's JavaScript reads and parses this SDP data, transmitting it asynchronously (via AJAX/Fetch or WebSocket) back to the target website's backend server.
IV. Risks and Hazards of WebRTC Leaks
Even if you employ top-tier VPN encryption algorithms and military-grade secure tunnels, a target website (such as Netflix, Binance, or other platforms requiring precise location and regional copyright verification) can instantly strip away your proxy identity with a basic WebRTC script, exposing your real domestic or local IP.
This introduces several severe consequences:
-
Geographical Penetration (Bypassing Geo-Proxies): Many streaming giants (like Netflix, Hulu, Disney+) and financial services use WebRTC to assist in risk control. If they notice your HTTP request originates from the US (via VPN) but your WebRTC candidate reports a true IP in China, the system instantly flags proxy usage, leading to account restrictions or outright access blocks.
-
Digital Fingerprinting & Identity Tracking: Because WebRTC simultaneously exposes your local network IP (e.g., 192.168.1.104), attackers or advertisers can combine "Public IP + Intranet IP + Browser User-Agent" into a highly persistent, high-precision device fingerprint to track your web behavior across various websites.
-
Physical Address Geolocation: By capturing your true public IP, anyone can cross-reference it with publicly available IP lookup databases, easily pinpointing your city, district, or even down to your local broadband distribution node or residential community.
-
Local Network Topology Exposure: Exposing internal IPs reveals your internal subnet layouts (e.g., whether you use a specific enterprise intranet structure). This hands external attackers valuable pre-reconnaissance intelligence for lateral movement and internal network exploits (such as SSRF attacks or local network device scanning).
V. How to Detect and Prevent WebRTC Leaks?
1. How to Test If Your Connection Is Leaking
You can visit specialized test sites with your VPN enabled to check if your real public or private IP is listed under the "WebRTC" section of the page:
2. Prevention and Mitigation Strategies
Depending on your browser preference and use cases, you can implement the following measures to completely plug this leak:
Method A: Use Browser Extensions (Recommended & Most Flexible)
Installing privacy extensions allows you to intercept or control WebRTC's behavior without disabling it entirely (disabling it completely can break web-based video conferencing applications):
-
WebRTC Control / WebRTC Block: Simple, one-click extensions to toggle WebRTC functionality on or off.
-
uBlock Origin: Open settings and check the option: "Prevent WebRTC from leaking local IP addresses".
-
Privacy Badger: Automatically blocks WebRTC requests identified as tracking vectors.
Method B: Disable or Configure WebRTC at the Core Browser Level
① Firefox — The Most Thorough Solution
Firefox allows users to completely disable WebRTC natively without requiring third-party plugins:
-
Type about:config in the address bar, press Enter, and accept the risk warning.
-
Search for media.peerconnection.enabled in the search bar.
-
Double-click this entry to change its value from true to false.
② Chrome: How to fix WebRTC leak Chrome 2026 configurations
Chrome does not support fully disabling WebRTC natively via its default settings page, but you can control its routing policies through official extensions or command-line parameters:
-
Install the official extension provided by Google: WebRTC Network Limiter.
-
In the extension options, choose "Use my default public IP address only" (to prevent local intranet IP probing) or "Disable non-proxied UDP" (forcing WebRTC traffic through proxy servers; if the proxy does not support UDP, WebRTC connections will simply be blocked).
③ Brave / Safari / Microsoft Edge
-
Brave: Features built-in robust privacy controls. Navigate to Settings -> Shields -> WebRTC IP Handling Policy and set it to Disable Non-Proxied UDP or Default Public Only.
-
Safari: Safari enforces relatively strict WebRTC permissions by default. However, you can fine-tune specific WebRTC settings by navigating to Develop -> Experimental Features (or Feature Flags).
-
Edge: Built on Chromium, Edge follows the same behavior as Chrome. It is recommended to use Chromium-compatible anti-leak extensions.
Deep Dive: Why Do VPN Leaks Occur? Root Causes of High-Frequency Vulnerabilities in 2026
In 2026, with the iteration of network infrastructure, the popularization of multi-protocol concurrent environments, and the increasing complexity of underlying operating system routing mechanisms, the security of VPNs (Virtual Private Networks) is facing unprecedented challenges. While encryption algorithms themselves (such as AES-256 and ChaCha20) remain mathematically impregnable, the "seepage and leakage" of data channels has become the primary breeding ground for privacy breaches.
This article provides an in-depth analysis of the four core technical vulnerability dimensions that most frequently lead to VPN leaks in 2026, dissecting their underlying causes and providing targeted defensive counterstrategies.
I. Incomplete "Half-Baked" Support for the IPv6 Protocol (IPv6 Leak)
1. Root Cause and 2026 Context
Global IPv6 adoption has reached an all-time high in 2026. Most mainstream Internet Service Providers (ISPs) and public Wi-Fi networks adopt a dual-stack (IPv4/IPv6) architecture by default, with some cutting-edge regions even deploying IPv6-only environments.
However, many outdated, budget, or poorly designed VPN clients still utilize a "single-track" system at their architectural core—only establishing virtual network cards and tunnel encryption for IPv4 traffic. For IPv6 traffic, they typically adopt one of two highly dangerous strategies:
-
Direct Bypass: Allowing IPv6 traffic to bypass the encrypted tunnel and flow directly out of the physical network interface card (NIC).
-
Failed Blackholing: Attempting to drop IPv6 traffic by modifying routing tables, which ultimately fails because it cannot adapt in real time to dynamically obtained temporary IPv6 addresses (Temporary Addresses).
2. Leak Trigger Mechanism
When a user visits a dual-stack website (such as Google, YouTube, and mainstream social or financial platforms), the modern operating system's network stack (in accordance with the RFC 6724 specification) prioritizes the IPv6 path to initiate the connection.
-
Flow: Operating system initiates an IPv6 connection request $\rightarrow$ detects that the VPN has not taken over IPv6 routing $\rightarrow$ sends the request directly through the local ISP's physical NIC.
-
Consequence: The user's real IPv6 address, physical geolocation, and destination targets are exposed directly to the destination server and passive interceptors. The VPN is rendered completely useless.
3. 2026 Defensive Strategies
-
Dual-Stack Tunneling: A competent VPN must allocate both private IPv4 and IPv6 addresses inside the tunnel, enforcing unified encryption on dual-stack traffic.
-
Forced Disabling (IPv6 Blackholing): If a VPN node does not support IPv6, the client must completely block (null-route) all outbound IPv6 traffic across the entire machine using firewall rules (such as iptables or the Windows Filtering Platform) during the initialization of the virtual network adapter.
II. Operating System's "Smart Multi-Homed Name Resolution" (SMHNR causing DNS Leak)
1. Root Cause and Technical Background
Deep within the core of Windows 10/11 and newer operating systems, there is a built-in mechanism called "Smart Multi-Homed Name Resolution" (SMHNR).
The design intent behind this mechanism is to provide the "ultimate user experience." In a multi-NIC environment (e.g., when a wired NIC, a wireless NIC, and a VPN virtual NIC coexist), to prevent slow web loading caused by a sluggish response from a DNS server on a specific network card, the system concurrently sends query requests to the DNS servers configured on all available network cards and directly adopts the result that returns the fastest.
2. Leak Trigger Mechanism
When a user types a domain name into a browser:
-
The system simultaneously sends resolution requests to the encrypted DNS inside the VPN tunnel and the local ISP's physical DNS.
-
The local ISP's DNS server is geographically closer to the user and does not require the overhead of multi-hop routing and decryption associated with the VPN tunnel, so it almost always wins the race (Winner).
-
The system accepts the result returned by the local DNS.
Although the subsequent data transmission might still traverse the VPN tunnel, the user's domain lookup queries (DNS Queries) have already been exposed to the local ISP in plain text. By auditing DNS traffic, third parties can pinpoint exactly what websites the user accessed and when (i.e., metadata leakage).
3. 2026 Defensive Strategies
-
Interface Binding: Force the system's DNS resolver to bind exclusively to the VPN's virtual network interface (TUN/TAP adapter), and disable DNS resolution capabilities on all other physical NICs.
-
Registry/Group Policy Intervention: In Windows systems, completely disable SMHNR by forcing the modification of the registry or group policy to set the DisableSmartNameResolution key.
-
DNS Leak Protection Engine: Real-time monitoring of the system's hosts file and dnscache service by the client during runtime, intercepting any outbound Port 53 (UDP/TCP) traffic that does not go through the VPN tunnel.
III. Lack of Seamless Protection on VPN Disconnections (Missing Kill Switch)
1. Root Cause and Technical Background
The physical characteristics of wireless networks (Wi-Fi/5G) dictate that brief signal jitter or cell tower handovers are inevitable. When minor network fluctuations occur, and the VPN tunnel suffers an extremely brief disconnection before triggering an automatic reconnection (even if it lasts for only one second or a few milliseconds), the operating system's default routing strategy is to immediately restore local network connectivity to maintain internet availability.
If the VPN client lacks a high-priority "Kill Switch," or if this switch only operates at the application layer (rather than the system kernel level), a security vacuum is created.
2. Leak Trigger Mechanism
-
Traditional Kill Switch (Application-level): Relies on monitoring the client's status. When a VPN disconnection is detected, it attempts to modify system routing tables or terminate specific processes. Under this mechanism, there is a millisecond-level delay between "detecting the disconnection" and "issuing the blocking command." During this brief window, background operating system programs (such as mail clients, instant messengers, browser background polling, etc.) have already eagerly sent a large volume of packets containing the user's real IP address via the physical NIC.
-
System-level Flaws: During the seamless reconnection attempt, real IP addresses and DNS queries are directly exposed to the public network in an unprotected manner, which is catastrophic for highly privacy-sensitive individuals.
3. 2026 Defensive Strategies
-
Active System-level Kill Switch: Must be based on the operating system kernel driver level (such as the Windows WFP driver, macOS Network Extension) or system firewalls (IP-Filter / NFTables).
-
Block-by-Default: Its operational philosophy should not be "block after disconnection," but rather "by default, prohibit any traffic from flowing to the physical gateway unless it goes through the VPN tunnel." This ensures that even if the VPN process crashes unexpectedly or is in the middle of reconnecting, the physical network adapter cannot send out even a single bit of unencrypted data.
IV. Native Flaws of Manual VPN Configuration (Manual Configuration Flaws)
1. Root Cause and Technical Background
Some advanced users, out of "distrust of third-party clients" or a desire for "lightweight operations," prefer to manually configure connections using the operating system's built-in VPN client (such as native L2TP/IPSec or IKEv2 connections in Windows, macOS, or iOS).
However, native OS VPN components are positioned for "Intranet Access" (enterprise internal network access) rather than "Privacy Anonymity." The design philosophies of these two use cases are fundamentally different: an enterprise VPN allows Split-Tunneling so that users can access local internet resources at high speeds while accessing the intranet, whereas a privacy VPN demands 100% traffic containment.
2. Leak Trigger Mechanism
Manually configured VPNs suffer from the following fatal flaws:
-
Static Routing Tables: Native clients cannot update routing tables dynamically in real-time as the network environment changes (such as switching Wi-Fi networks or the physical NIC renewing its IP address). This highly easily leads to invalid routing entries, causing traffic to fall back to the default gateway.
-
Lack of Auxiliary Protections: Native configurations cannot provide an array of application-level security policies such as DNS preemptive protection, automatic IPv6 blocking, and seamless Kill Switches. According to industry test data from 2026, the probability of DNS and IPv6 leaks occurring with native, manually configured VPNs exceeds 90%.
3. 2026 Defensive Strategies
-
Abandon Outdated Native Protocols: Stop using obsolete manual configuration protocols like L2TP/PPTP, which lack modern network adaptation capabilities.
-
Embrace Modern Open-Source Clients: If you insist on not using commercial clients, you should choose modern, strictly audited official clients provided by WireGuard or OpenVPN, and manually construct a global traffic lock in conjunction with local firewall rules (such as UFW or Simplewall).
Detailed Troubleshooting and Technical Verification
1. 【Step 1: Baseline Test】— Establishing the Unprotected Network Identity Baseline
Operating Guide:
Disconnect all VPNs, proxy tools, and browser proxy extensions. Open a private/incognito window in your browser and visit ipleak.net (or the alternative test source dnsleaktest.com). Carefully record your real IPv4 address, IPv6 address, the list of DNS server IPs, and the geographic location/ISP detected by the system.
Technical Expansion & Principle Analysis:
-
Why is a baseline test necessary? The baseline test acts as the "blank control group" in a clinical trial. DNS node characteristics distributed by different provinces and broadband operators (e.g., Telecom, Unicom, Mobile) vary significantly. Recording your real network fingerprint at this stage allows for precise "fingerprint comparison" in subsequent steps.
-
Avoid Common Pitfalls: When performing the baseline test, you must ensure that all global or rule-based proxies are turned off. It is also recommended to clear your browser cache to prevent cached data from interfering with the real-time detection results on the test page.
2. 【Step 2: Connection Test】— Verifying the Successful Establishment of the Main Tunnel Entrance
Operating Guide:
Enable your VPN connection and ensure it is running in "Global (Global / TUN Mode)" state. Refresh or reopen the detection website, and observe the "Your IP Address" section displayed at the top of the page. Confirm that this IP address has successfully changed to your chosen VPN destination country/region, and that the ISP information has changed to the data center hosting the VPN node (such as M247, Cogent, DigitalOcean, etc.) or a local residential ISP abroad.
Technical Expansion & Principle Analysis:
-
Common reasons for failed primary IP switching:
-
Proxy routing rule interference: Many proxy clients enable "Rule Mode" or "Bypass LAN & Mainland China" by default, which causes access to the test website to still go through the local direct connection.
-
Virtual Network Adapter (TUN) driver not enabled: The software displays a successful connection, but the underlying system routing table failed to modify, meaning traffic was not actually guided into the secure tunnel.
-
Beware of "Half-Baked" Proxies: If you find that the primary IP has changed, but the geographical location is still identified as your home country, or the IP owner does not match your chosen node, it indicates that the VPN's routing table control has serious defects. This is an extremely insecure "half-baked" connection, and its use should be terminated immediately.
3. 【Step 3: DNS Deep Test】— Severing the Strongest Silent Leak Killer
Operating Guide:
On the detection page, find the dedicated DNS Address module (if using dnsleaktest.com, make sure to click and run the Extended Test for an in-depth analysis). Wait for the test to finish running and carefully inspect all listed DNS server IPs, national flags, and text descriptions.
-
Judgement Standard: If you see even a single IP, national flag, or text description belonging to your actual local ISP (such as China Telecom, China Unicom, China Mobile, etc.) in this list, the connection must immediately be judged as insecure.
Technical Expansion & Principle Analysis:
-
What is a DNS Leak? The DNS (Domain Name System) is responsible for translating domain names (like google.com) into IP addresses. In many cases, even if your main IP is displayed as being overseas, your operating system might still habitually send resolution queries to your local ISP's DNS servers when resolving websites.
-
Devastating consequences of a leak: Once a DNS leak occurs, although the target website might not know who you are, local network eavesdroppers and ISPs can be 100% certain of which sensitive foreign websites you visited at that exact timestamp. In the network environment of 2026, DNS traffic auditing is the very first red line of safety protection.
-
Remediation and Fixes:
-
Enable "Block non-VPN DNS" or "DNS Leak Protection" in your VPN client settings.
-
Manually change the DNS servers of your local network card to secure public DNS (such as 1.1.1.1 or 8.8.8.8), and strictly forbid using the ISP-assigned DNS distributed by default.
4. 【Step 4: WebRTC Penetration Test】— Plugging the Physical Leak Hole in the Browser's Core
Operating Guide:
Scroll down the ipleak.net page to find the WebRTC Detection section. Focus on the "Public IP Address" and "Local IP Address" fields.
-
Judgement Standard: If the displayed "Public IP" is still the real public IP you recorded during Step 1, it means your browser is betraying you, and your actual physical network address has been completely exposed!
Technical Expansion & Principle Analysis:
-
How WebRTC bypasses proxies: WebRTC (Web Real-Time Communication) is an audio/video real-time transmission technology supported by HTML5. To achieve peer-to-peer (P2P) direct connections between browsers, WebRTC allows web pages to directly invoke the system's underlying STUN/TURN protocols via JavaScript. This process bypasses the vast majority of application-level proxies and browser proxy extensions, directly obtaining and sending your real local intranet IP and public IP back to the webpage.
-
Remediation and Fixes:
-
Chrome / Edge Browsers: Install extensions such as WebRTC Control or WebRTC Leak Shield and set them to disabled; or enable the Virtual Network Adapter (TUN) mode in your proxy software to force takeover of all system-level UDP traffic.
-
Firefox Browser: Type about:config in the address bar, search for media.peerconnection.enabled, and double-click to change its value to false.
-
Mobile Devices (iOS/Android): Try to use system-wide global VPNs (such as WireGuard / IPsec) and avoid using proxy services that only take effect within a specific app.
5. 【Step 5: IPv6 Special Investigation】— Blocking the "Backdoor" under Modern Dual-Stack Networks
Operating Guide:
Check the IPv6 Test section on the test page.
-
Judgement Standard: If the page displays a detected IPv6 address, and that address belongs to your actual physical ISP (operator) after comparison, it means your IPv6 is currently operating in an unprotected, "unclad" state. You must take immediate action!
Technical Expansion & Principle Analysis:
-
Why does IPv6 silently bypass protection? Entering 2026, global home broadband and mobile networks have fully popularized dual-stack IPv4/IPv6 networks. However, the vast majority of mid-to-low-end VPNs or legacy proxy protocols on the market only support tunnel encryption for IPv4 traffic. When a client initiates access, if the target website supports IPv6, the operating system will prioritize transmitting data via the native, unencrypted local IPv6 pipe, rendering the VPN tunnel practically non-existent.
-
Remediation and Fixes:
-
Solution A (Most Secure: Directly disable IPv6 on your device):
-
Windows path: Control Panel -> Network and Sharing Center -> Change adapter settings -> Right-click current network properties -> Uncheck "Internet Protocol Version 6 (TCP/IPv6)".
-
macOS path: Execute the following command in Terminal: networksetup -setv6off Wi-Fi (or the corresponding name of your network card).
-
Solution B (Upgrade your VPN client):
-
Choose a modern VPN protocol that supports "IPv6 Leak Protection" or "Dual-Stack Tunneling" (such as WireGuard, or VLESS/Trojan with TUN global management).
Complete Fix: Universal DNS + WebRTC Leak Solution (Effective 2026)
In the realm of network privacy and anonymity, even if you are using an encrypted proxy or a VPN tunnel, your real network fingerprint (real IP address, geographical location, ISP information) can still be exposed through two of the most stealthy channels: DNS Leaks (Domain Name System Leaks) and WebRTC Leaks (Web Real-Time Communication Leaks).
If you detect a leak during troubleshooting, don't panic. Below is the simplest, most thorough universal fix and hardening solution that remains fully effective in 2026:
Solution A: How to Completely Fix DNS Leaks
What is a DNS Leak?
When you visit a webpage, your browser needs to resolve the domain name (e.g., example.com) into an IP address. If your encrypted connection does not completely take over this process, the system will default to making requests to your local internet service provider's (ISP) DNS servers. Consequently, even if your webpage content is encrypted, your ISP (and eavesdroppers) can still see all the domains you visit, and they can even block connections directly via DNS poisoning.
Method 1: Enable Native Protection in Your VPN/Proxy Client (Most Recommended)
The vast majority of modern high-quality VPN/proxy clients have built-in system-level driver-based network routing and interception. Enter your client's settings (Settings/Preferences) and make sure to enable the following core switches:
-
Prevent DNS Leaks: Forces the interception of physical port $53$ (DNS traffic) across all network cards on the system, redirecting all of it into the encrypted tunnel of the virtual network card.
-
IPv6 Leak Protection: Since many legacy proxy clients only support IPv4, when your network supports and enables dual-stack (IPv4/IPv6), IPv6 traffic might bypass the proxy and leak directly. Enabling this option will directly disable IPv6 traffic on the virtual network card or tunnel and encrypt IPv6 traffic.
-
Kill Switch: This is the final line of defense. When the VPN accidentally disconnects or reconnects, it immediately cuts off the entire device's internet connection by modifying system firewall rules (such as the Windows Filtering Platform or macOS PF), preventing your real IP from being exposed when the proxy is offline.
Method 2: Manually Modify the Operating System's DNS Servers
If your proxy client is basic and lacks interception capabilities, or if you are using manually configured native protocols like WireGuard or OpenVPN, you can manually force your computer's network adapter DNS to secure, anonymous public DNS servers to avoid using the ISP's default assigned DNS.
Recommended No-Logs, High-Security Public DNS List
-
Cloudflare DNS: $1.1.1.1$ and $1.0.0.1$ (supports DNS over HTTPS / TLS, extremely fast resolution speed)
-
Google Public DNS: $8.8.8.8$ and $8.8.4.4$ (highly stable, widely deployed globally)
-
Quad9 DNS: $9.9.9.9$ (automatically blocks malicious websites and phishing domains)
Manual Modification Steps for Major Operating Systems:
1. Windows 11 / 10
-
Press the Win + R keys, type ncpa.cpl and hit Enter to open the "Network Connections" window.
-
Locate your active physical network adapter connected to the internet (typically "Ethernet" or "Wi-Fi"; do not select virtual adapters).
-
Right-click the adapter and select Properties.
-
Double-click Internet Protocol Version 4 (TCP/IPv4) in the list.
-
Select Use the following DNS server addresses.
-
Fill in the respective IPs in "Preferred DNS server" and "Alternate DNS server" (e.g., $1.1.1.1$ and $1.0.0.1$).
-
Click OK to save. To ensure it takes effect completely, you can open CMD and run the command: ipconfig /flushdns to flush the cache.
2. macOS (Sequoia / Sonoma)
-
Click the Apple icon in the top-left corner and open System Settings.
-
Click Network on the left sidebar, select your active Wi-Fi or Ethernet connection on the right, and click Details....
-
Switch to the DNS tab on the left sidebar.
-
In the "DNS Servers" list, click the + button at the bottom and add $1.1.1.1$ and $1.0.0.1$.
-
Remove any existing local gateway or ISP DNS addresses from the list.
-
Click OK and apply the changes. Open Terminal and run the following command to flush the cache:
sudo dscacheutil -flushcache; sudo killall -HUP mDNSResponder
3. Linux (Ubuntu / Debian / Fedora)
Modern Linux distributions mostly use systemd-resolved or NetworkManager to manage networking:
-
Using the Desktop Environment: Go to System Settings -> Network -> Select your connected Wi-Fi/Wired connection -> Click the gear icon -> Switch to the IPv4 tab -> Turn off the "Automatic (DNS)" switch -> Enter 1.1.1.1, 1.0.0.1 in the DNS field -> Click Apply.
-
Via Terminal: Edit the configuration file /etc/systemd/resolved.conf, change #DNS= to DNS=1.1.1.1 1.0.0.1, save, and restart the service:
sudo systemctl restart systemd-resolved
Method 3: Completely Disable Local IPv6 Protocol (If VPN is Not Supported)
If your proxy client or network environment does not support IPv6 tunnel encryption, the safest approach to prevent "half-exposed" states caused by IPv6 leaks is to directly disable IPv6 at the operating system level.
1. Windows Platform
-
Press the Win + R keys, type ncpa.cpl and hit Enter.
-
Right-click your active network adapter and select Properties.
-
In the item list that appears, find Internet Protocol Version 6 (TCP/IPv6).
-
Uncheck this item, then click OK to save.
-
Repeat this process for all physical adapters (including wired and wireless).
2. Linux Platform
Add the following lines to the end of the /etc/sysctl.conf file:
net.ipv6.conf.all.disable_ipv6 = 1
net.ipv6.conf.default.disable_ipv6 = 1
net.ipv6.conf.lo.disable_ipv6 = 1
After saving, run sudo sysctl -p in the terminal to apply the configuration immediately.
Solution B: How to Completely Fix WebRTC Leaks
What is a WebRTC Leak?
WebRTC is a web technology that allows browsers to conduct real-time voice or video calls. To establish peer-to-peer (P2P) connections, the WebRTC protocol is designed to bypass various proxies and firewalls. With just a few lines of JavaScript within a browser, even if you have a global proxy enabled, webpages can force the retrieval and exposure of your local private IP address (such as 192.168.1.X) and your real public IPv4/IPv6 address via STUN/TURN servers without requiring user authorization.
Because WebRTC leaks are browser-level behaviors, defense must be configured browser by browser.
Method 1: Disable WebRTC in Mozilla Firefox (Most Recommended & Thorough)
Firefox is currently the only mainstream modern desktop browser that can perfectly and completely disable WebRTC at the core level without relying on any third-party security extensions.
-
Type about:config in the Firefox address bar and press Enter.
-
On the warning page that appears, click the Accept the Risk and Continue button.
-
In the search bar at the top of the page, copy and paste:
media.peerconnection.enabled
-
In the search results, double-click this item (or click the toggle button on the right) to change its value from true to false.
-
Restart Firefox. At this point, the WebRTC module is completely disabled at the core level of Firefox, and no webpage can invoke it.
Method 2: Use Browser Extensions (Applicable to Chromium Browsers like Chrome, Edge, Brave, etc.)
Since browsers like Google Chrome and Microsoft Edge are developed based on the Chromium engine, Google does not provide a native switch to disable WebRTC directly in the settings for "user experience" reasons. You must rely on browser extensions for advanced blocking or policy modifications:
Option A: Use uBlock Origin Rules to Intercept (Most Recommended)
If you already have uBlock Origin installed, there is no need to download other extensions; simply enable the interception in its privacy settings:
-
Click the uBlock Origin icon in the top-right corner of the browser, then click the Settings button (gear icon).
-
In the dashboard that opens, navigate to the Privacy tab.
-
Check Prevent WebRTC from leaking local IP addresses.
-
By checking this option, uBlock will force WebRTC to work only through proxy channels or non-default physical network adapters, thereby hiding your real IP.
Option B: Use Specialized Single-Function Extensions (For Users Requiring Strict Disabling)
If you wish to completely disable WebRTC, you can go to the Chrome Web Store and install the following extensions:
-
WebRTC Control: Provides a one-click toggle. Clicking the extension icon so it turns red means the WebRTC feature is completely blocked.
-
WebRTC Leak Prevent: Allows you to customize WebRTC's IP handling policy. Set the "IP handling policy" in the extension configuration to:
-
Disable non-proxies UDP (force proxy) or
-
Disable all (Note: some policies might cause normal webpage video conferences to fail to connect).
Method 3: Mobile Browser (iOS & Android) Leak Prevention Guide
Not only on desktops, but WebRTC leaks on mobile devices are also widespread.
Android Devices
-
Kiwi Browser / Yandex Browser: These two Android browsers support desktop Chrome extensions. You can download and install uBlock Origin inside them and enable the leak prevention setting following the desktop method.
-
Firefox for Android: Mobile Firefox also supports manually searching and setting media.peerconnection.enabled to false via about:config (Note: some newer versions might require going to Add-ons to install privacy protection plug-ins).
iOS Devices (iPhone / iPad)
Due to iOS limitations, third-party browsers (Chrome, Edge, etc.) must use Safari's WebKit engine at the core level. Therefore, their security settings depend on Safari's system-wide configuration:
-
Open Settings on your iPhone.
-
Scroll down to find and tap Safari.
-
Scroll to the bottom and tap Advanced.
-
Tap Web Inspector and Developer Tools or look for Feature Flags (Experimental features list).
-
In the massive feature list, locate options containing the WebRTC keyword (such as WebRTC mDNS ICE candidates or WebRTC Sockets constraints).
Tip: iOS Safari enforces the use of mDNS (Multicast DNS) by default to hide local IPs, making leak risks low during normal proxy connections. If you still have concerns, you can use iOS proxy clients that support system-wide local global proxy configuration to block UDP 53/STUN ports.
Ultimate Verification: How to Test If the Fix Was Successful?
Once the fixes are completed, it is highly recommended to completely close and reopen your browser. Then, visit the following authoritative, unbiased testing websites for cross-validation:
-
Browserleaks (Highly Recommended): https://browserleaks.com/webrtc
-
Checkpoint: On the "WebRTC Leak Test" page, check if the Local IP Address and Public IP Address are empty, show as local virtual LAN IPs (such as 127.0.0.1), or only display your VPN node IP. If your real ISP-provided physical IP appears here, it means WebRTC is still leaking.
-
Checkpoint: Click Standard Test or Extended Test. After the test completes, inspect the listed DNS server IPs. If it only displays servers in the country where your proxy node is located (e.g., servers in the US, Japan, or Singapore), the fix is successful. If any servers from your actual country, local province, or your real ISP (such as China Telecom, China Unicom, China Mobile) appear on the list, it indicates that DNS is still leaking. Please return to "Method 2" to double-check the DNS modification on your physical network adapters.
2026 Quality Free Leak Test Tools List (No Ads, Highly Reliable)
When conducting security self-checks, please avoid using detection tools that contain a large number of promotional advertisements or are unreliable. Below is a list of the most accurate, ad-free, and free test tools mutually recognized by global cybersecurity experts in 2026:
|
Tool Name |
Official Website |
Core Advantages |
|
dnsleaktest.com |
The most classic specialized DNS testing tool, providing Extended (multi-query) testing that can capture intermittent leaks. |
|
|
ipleak.net |
The ultimate all-in-one leak detection suite. A single screen simultaneously detects IPv4/IPv6, DNS, WebRTC, and Torrent magnet link leaks. |
|
|
browserleaks.com |
An extremely professional browser fingerprinting and protocol testing site, offering WebRTC, Canvas, SSL/TLS, and other comprehensive security profiling. |
|
|
expressvpn.com/webrtc-leak-test |
Even if you do not use their service, their official WebRTC and DNS leak educational resources and individual self-check tools are extremely clean and user-friendly. |
Summary: Core Essentials of VPN Anonymity and Protection in 2026
In 2026, achieving perfect online anonymity is no longer a simple "one-click-to-enable" matter that allows you to rest easy. With the iteration of ISP Deep Packet Inspection (DPI) technologies, the ubiquity of active network mapping, and the refinement of browser fingerprinting techniques, relying solely on a client's "Connect" button is no longer enough to block multi-dimensional tracking. To ensure that your true location is not exposed, please keep the following protection pyramid rules firmly in mind:
I. Tools are the Foundation: Building a Solid Fortress of Underlying Technology
Choosing a VPN service should not only be based on connection speeds; the underlying architecture of security and privacy is the critical factor that determines survival. In 2026, a top-tier VPN must meet the following three rigid technical standards:
1. Independently Operated Private DNS Servers
-
Mechanism Analysis: The vast majority of "free" or "budget" VPNs still use public DNS (such as Google 8.8.8.8 or Cloudflare 1.1.1.1). This leads to "DNS leaks," allowing your ISP to see exactly which domains you are visiting, even if they cannot intercept the contents of your communications.
-
Protection Standard: You must choose a provider that owns exclusive private DNS servers. All DNS requests must be resolved with encryption inside the VPN's virtual tunnel, eliminating any third-party side-channel monitoring.
2. Native IPv6 Leak Protection Support
-
Mechanism Analysis: By 2026, global IPv6 deployment has reached new heights. Because many outdated VPN protocols only tunnel and encrypt IPv4 traffic, when your local network attempts to establish an IPv6 connection, the traffic bypasses the VPN tunnel and flows directly out through your ISP's physical network card, instantly exposing your real IP.
-
Protection Standard: The VPN client must feature dual-stack traffic management capabilities, or directly enforce IPv6 blocking (IPv6 Blackholing) at the system level, ensuring that no traffic from any protocol can escape unless it is tunneled.
3. System-Level Firewall Kill Switch
-
Mechanism Analysis: Traditional application-level Kill Switches merely attempt to close specific software when they detect a VPN disconnection, which suffers from response delays.
-
Protection Standard: You must enable a system-level, firewall-based Kill Switch. By directly modifying the operating system's routing tables and firewall rules (such as Windows Filtering Platform [WFP] on Windows or iptables on Linux), it ensures that even during a 0.1-second accidental drop in the VPN connection, the system instantly blocks all non-tunneled network traffic, physically preventing any packet leakage.
II. Configuration is the Core: Eliminating Hidden Leaks from Systems and Browsers
"Default configuration" is the ultimate enemy of anonymity protection. Even if your VPN software is rock-solid, many default features of your operating system and browser will quietly betray you:
1. Actively Restrict or Disable the WebRTC Protocol
-
Leak Mechanism: WebRTC (Web Real-Time Communication) is a standard component in modern browsers. Even if you are running a global VPN, malicious JavaScript code on web pages can still bypass the tunnel via WebRTC's ICE framework to query your local network cards directly, obtaining and reporting your real LAN IP and physical public IP address.
-
Practical Recommendations:
-
In Firefox: Enter about:config in the address bar and set media.peerconnection.enabled to false.
-
In Chrome/Edge: Install a leak prevention extension (such as WebRTC Control), or directly use a privacy-focused, hardened browser (such as Mullvad Browser or Tor Browser).
2. Completely Disable Physical IPv6 When Unnecessary for the System
-
Practical Recommendation: If your network environment does not require IPv6 for specific business needs, or if your VPN client's protection is not robust enough, it is recommended to directly uncheck "Internet Protocol Version 6 (TCP/IPv6)" in your operating system's network adapter properties. This cuts off the potential source of leaks at the system level.
3. Reject Blind Faith in the "One-Click Protection" of Global VPNs
-
Mechanism Analysis: Although split tunneling and smart routing are convenient, rule failures can easily cause sensitive applications to bypass the VPN and run through your local network.
-
Protection Standard: When handling highly sensitive data exchanges, cross-border e-commerce operations, or cryptocurrency transactions, you must adopt a strictly global proxy mode. This should be combined with virtual machine (VM) environments or double VPN (Multi-Hop) chains to achieve absolute physical isolation of traffic.
III. Habits are the Defense Line: Strictly Executing the "Five-Step Check"
No matter how perfect your technical configuration is, it cannot prevent the exposure of "human fingerprints" caused by operational oversight. Before performing any sensitive operation, cross-border business, or private communication, you must build muscle memory and strictly execute the following "Five-Step Check":
Step 1: Cold Start & Cleanup ──> Step 2: Adapter Status Verification ──> Step 3: Tunnel Leak Testing ──> Step 4: Time & Location Alignment ──> Step 5: Deep Fingerprint Audit
Step 1: Cold Start and Environment Cleanup
-
Action: Close all non-essential background software, especially clients with auto-update features and domestic telemetry (data collection) services.
-
Operation: Thoroughly clear your browser cache, cookies, and Service Workers to ensure that your new connections are not linked to previous identity cookies. It is highly recommended to use a completely fresh, clean "Incognito/Private" window every time, or directly roll back to a clean virtual machine snapshot.
Step 2: Network Adapter and Protocol Status Verification
-
Action: Check your local network connection status and confirm that IPv6 on your physical network adapter is disabled (if your VPN does not provide native protection).
-
Operation: Ensure that you have not enabled any local proxies, automatic proxy scripts (PAC), or conflicting virtual network card drivers that might cause traffic bypasses.
Step 3: Virtual Tunnel Leak Testing (Empirical Verification)
-
Action: After turning on your VPN, do not rush to open your target website. First, visit authoritative anonymity detection platforms (such as ipleak.net or dnsleaktest.com).
-
Detection Metrics:
-
IP Address: Must display the overseas IP of your VPN node, with no exposure of your real physical IP.
-
DNS Leak Test: Run an Extended Test to inspect the list of resolving servers. If any servers belonging to your real physical broadband ISP (e.g., China Telecom/Unicom/Mobile) appear on the list, a DNS leak exists, and you must disconnect and reconfigure immediately.
-
WebRTC Detection: Check if the WebRTC section displays as empty, or if the displayed IP is completely consistent with your VPN node's IP.
Step 4: System Time and Geographical Location Alignment
-
Action: Verify whether your system's "Time Zone" and "System Language" are highly consistent with the country where your VPN node is located.
-
Mechanism Analysis: If your VPN node is in US West (Los Angeles), but your system time is Beijing Time (GMT+8), the browser will expose this contradiction via APIs. This "time zone mismatch" is a primary trigger for account suspensions on major e-commerce risk control systems and social media platforms.
-
Operation: Manually change your operating system's time zone to match the node's location, and adjust your browser's preferred language to the node's local language (e.g., en-US).
Step 5: Deep Browser Fingerprint Audit
-
Action: Use browserleaks.com or coveryourtracks.eff.org to test the overall anti-association capabilities of your setup.
-
Detection Metrics: Inspect the User-Agent, Canvas fingerprint, WebGL reports, and system font lists. Ensure that this fingerprint information remains within safe parameters, and does not expose—via unique graphics card models or specific font configurations—that you are actually operating on a computer with a Chinese-language system.
Related guide: The Ultimate Guide to Best Free Public DNS Servers & How to Change DNS with a VPN
Frequently Asked Questions (FAQ)
Q: Why does my WebRTC test show an IP like 192.168.1.105? Does this count as a leak?
A: This is not a serious privacy leak. This is your local area network private IP (Local/Private IP). This kind of IP is randomly assigned to you by your home router, and hundreds of millions of devices around the world use the exact same private IP. Websites cannot reverse-lookup your real physical location through a 192.168.x.x local network address. It only counts as a leak if it displays your real public IP (Public IP) distributed by your telecom operator (such as Telecom/Unicom/Mobile).
Q: I have already enabled Chrome's Incognito mode, why is WebRTC still leaking?
A: Incognito mode cannot prevent WebRTC leaks. The primary function of Incognito (private) mode is: not saving your browsing history, cookies, and form data after closing the window. It does not alter the browser's underlying network communication protocols and API behaviors at all. In Incognito mode, WebRTC still happily transmits your real IP to the outside in the background. You must use the extension method mentioned above to fix it.
Q: Why do some VPN testing sites show that I have a leak, while another site shows that I am secure?
A: This depends on the request concurrency and caching mechanism of the testing server. Some test sites only perform a single simple DNS resolution, while something like dnsleaktest.com's Extended Test will continuously send dozens of different random domain name queries. Because mechanisms like SMHNR (Smart Multi-Homed Name Resolution) in systems like Windows try to resolve concurrently, a single test might just happen to be answered first by the VPN's DNS, thus showing "secure"; but in high-concurrency deep tests, as long as the local ISP's DNS successfully answers first even once, it will be accurately captured by the deep testing tool. Therefore, please always rely on the multiple results of the Extended Test.
Q: I bought a paid VPN advertised as "100% leak-proof," do I still need to run these tests?
A: Absolutely. No VPN can 100% control your operating system's underlying updates, or unknown zero-day vulnerabilities (Zero-Day) in browsers. When an operating system (such as Windows 11) pushes a major update, many network adapter drivers and network stack settings might be reset, causing an otherwise secure VPN to leak silently. Regular self-testing is the only way to ensure absolute security.
Q: If a leak is detected during testing, what are the fastest and most thorough steps to fix it?
A: Please follow these prioritized steps for urgent remediation:
-
Change VPN Protocol: In your client settings, change the protocol from Automatic or IKEv2 to WireGuard or OpenVPN (UDP). These two protocols have the strongest control over the routing table.
-
Enable Core Switches: Make sure that Kill Switch (Network Lock), DNS Leak Protection, and IPv6 Leak Protection in your VPN settings are all checked and enabled.
-
Disable System IPv6: In your computer's network connection settings, directly disable the IPv6 protocol of your physical network adapter.
-
Clear Cache: Run ipconfig /flushdns in the Command Prompt (CMD) to clear the local DNS cache, completely close your browser, and reopen it before testing again.