Even in 2026, with the widespread adoption of cloud services and high-speed fiber optics, the act of "multiplayer connectivity" still presents a formidable, invisible wall for many gamers and power users. To understand why LogMeIn Hamachi is hailed as a "Multiplayer Artifact," we must first examine the nature of this wall: NAT and Port Forwarding.
Why Do We Need a Virtual LAN?
1. The Pain Points of Traditional Connectivity: The "Nightmare" of Public IPs and Port Forwarding
Many players of games like Minecraft, Terraria, or classic titles have experienced this frustrating scenario: your friend is clearly online, yet no matter what IP address you enter, the screen stubbornly displays "Cannot connect to server." The culprit behind this is usually the complexity of modern network architecture.
What is NAT (Network Address Translation)?
Simply put, the internet functions like a massive apartment complex (the Public Network), and your home router acts as a single apartment unit. To combat the exhaustion of IP addresses, ISPs typically do not assign a unique Public IP (a street address) to every device in your home (your PC, phone, console). Instead, the router uses NAT (Network Address Translation) technology to assign Private IPs (e.g., 192.168.1.x) to your internal devices.
Analogy: Your computer is like a secondary bedroom inside the apartment with no external mailbox. An incoming data package (your friend's connection request) can only be delivered to the apartment complex's main entrance (your router's Public IP), but the delivery person doesn't know which specific room to take it to.
What is Port Forwarding?
To allow your friend to connect to your game host, you must act as a "doorman," instructing the router: "Any data packets arriving at port 25565 (the default Minecraft port) should be handed over to the device at 192.168.1.5." This critical step is known as Port Forwarding.
Why is it a "Nightmare" for the Average User?
-
Public IP Scarcity (CGNAT): In 2026, IPv4 addresses are severely depleted. Most Internet Service Providers (ISPs) no longer even offer dynamic Public IPs, instead utilizing CGNAT (Carrier-Grade NAT) technology. This means your home router is also trapped within a massive private network, effectively having no external "apartment entrance" to begin with, rendering port forwarding completely useless.
-
Configuration Complexity: Router interfaces vary wildly between brands. Setting a static IP, selecting TCP/UDP protocols, configuring firewall exceptions... a mistake at any single step leads to connection failure.
-
Security Risk: Directly exposing an internal port to the public network is akin to leaving a window open to receive a package—it makes your system vulnerable to hacking attempts and vulnerability scans.
2.What is LogMeIn Hamachi? Core Technology Analysis: Virtual NIC, P2P Direct Connection, and AES-256 Encryption
LogMeIn Hamachi was created precisely to solve these "NAT traversal" challenges. It is not a simple network accelerator, but a zero-configuration Virtual Private Network (VPN) service, or more accurately, a Virtual LAN (VLAN) construction tool.
Core Technology: P2P (Peer-to-Peer) and Relay Traversal
Hamachi's power lies in its fusion of two core communication modes:
-
P2P (Peer-to-Peer) Direct Connection: This is Hamachi's preferred mode. It utilizes UDP Hole Punching techniques to attempt a direct connection between two devices behind different NATs. If successful, data bypasses third-party servers, offering the fastest speed and lowest latency (indicated by a green light status).
-
Relay Server: When a direct connection fails due to complex firewalls or Symmetric NATs, Hamachi automatically switches to relay mode. Data is forwarded through LogMeIn's servers. While this increases latency (resulting in a "yellow exclamation mark" or blue light), it serves as a crucial fallback, ensuring a connection "no matter how hostile the network environment."
Brief Overview of How It Works
-
Virtualization: When you install Hamachi, it installs a Virtual Network Interface Card (NIC) into your operating system, assigning a dedicated IP address starting with 25.x.x.x to this virtual NIC.
-
Tunnel Establishment: Regardless of where you and your friends are located, as long as you are all connected to the same Hamachi network, the software establishes a highly-encrypted tunnel (typically using AES-256 standard) between your devices.
-
LAN Simulation: To the operating system and game applications, your devices appear to be connected by a single physical cable. Windows believes you are on the same physical LAN, thereby completely bypassing the router's port restrictions.
3. Hamachi in 2026: Current Status and Key Advantages
Although new networking tools like ZeroTier and Tailscale have emerged, LogMeIn Hamachi still maintains an important position in 2026 due to its unique advantages.
Version Status and Platform Support
The current Hamachi version is more lightweight, maintaining its classic minimalist design aesthetic.
-
Windows: Fully featured with the most user-friendly graphical interface, making it the top choice for the majority of gamers.
-
macOS: Offers full graphical interface support and seamless cross-platform connectivity with the Windows client.
-
Linux: Primarily available as a Command Line Interface (CLI) version, suitable for power users and server-side deployment (e.g., setting up a 24/7 private cloud drive).
-
iOS / Android: While mobile support primarily relies on importing system-level VPN configuration files, internal network resources can still be accessed via the web-based backend management console.
Irreplaceable Scenario Advantages
-
Top Choice for Classic Games: For older games like Red Alert 2, Warcraft III, and CS 1.6 that rely on IPX protocol or broadcast mechanisms, Hamachi's virtual NIC compatibility often outperforms modern Mesh networking tools.
-
Extremely Simple One-Click Operation: Compared to other tools that require configuring routing tables or Zero Trust policies, Hamachi's logic—"Create Network ID -> Friend Enters ID to Join"—remains the most intuitive and user-friendly method available.
-
Temporary Remote Work/Maintenance: For quickly establishing a Remote Desktop connection to a work PC or accessing files on a home NAS, Hamachi can set up a secure channel in minutes without requiring complex VPN permissions from an IT department.
LogMeIn Hamachi Quick Start Guide: From Download to Successful Multiplayer

This guide will walk you through the five simple steps required to set up Hamachi and establish your first virtual LAN connection for gaming or remote access.
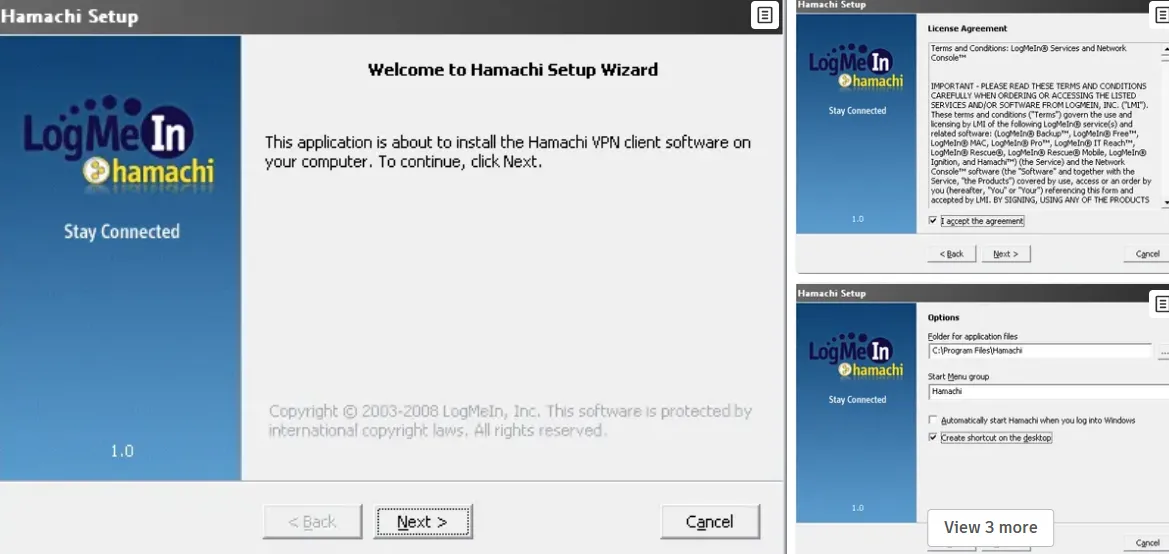
Step 1: Download and Installation
-
Download: Navigate to the official LogMeIn Hamachi website. Select the "Unmanaged" version (Free tier) for personal use.
-
Installation: The setup process is straightforward.
-
Run the installer and click Next.
-
Accept the End-User License Agreement (EULA).
-
Choose the installation path (default is recommended).
-
Click Install and wait for the process to complete.
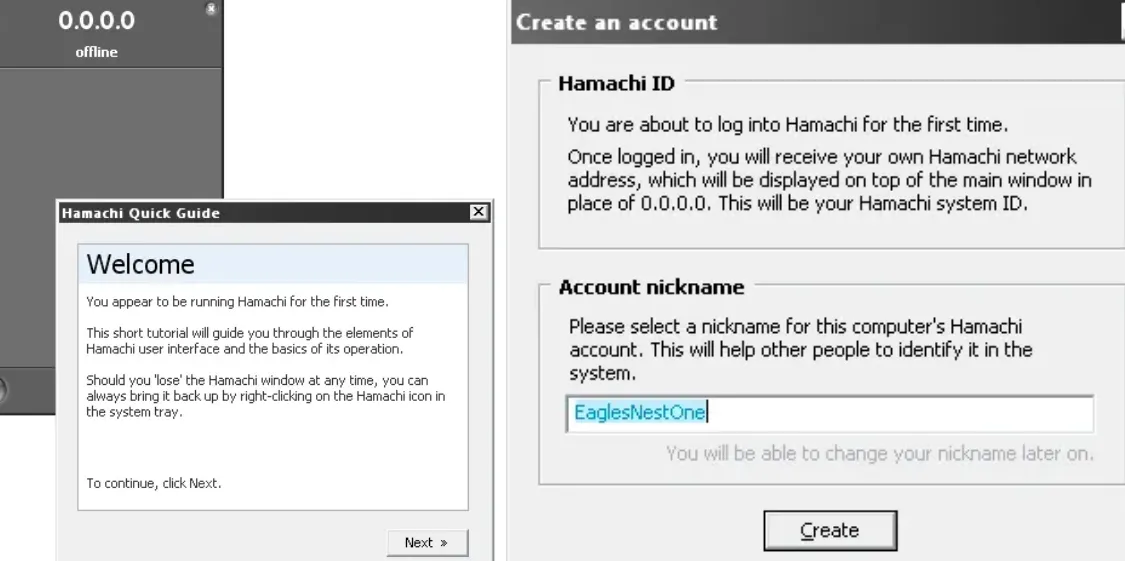
Step 2: Account Login and Power On
-
Log in: Upon first launch, Hamachi will prompt you to log in. You must use an existing LogMeIn account or create a new one. This account is essential for managing your Hamachi networks online.
-
Power On: Once logged in, click the large Power On button (which looks like a power symbol) in the main interface. Hamachi will assign a virtual IP address (e.g., 25.x.x.x) to your machine and activate the Virtual NIC.
Step 3: Creating a New Network (Host Perspective)
If you are the one hosting the game or resource, you need to create the network:
-
Click the "Create a new network" button.
-
Set Network ID: Choose a unique, memorable name (e.g., My-MC-Server-2026).
-
Set Password: Choose a strong password. You will need to share both the Network ID and Password with your friends.
-
Once created, your network name will appear in the main window. Your friends can now join.
Step 4: Joining an Existing Network (Client Perspective)
If you are joining a friend's hosted game, you need to join their network:
-
Click the "Join an existing network" button.
-
Enter Network ID: Input the exact Network ID provided by the host.
-
Enter Password: Input the corresponding password.
-
Click Join. If successful, the network name will appear in your Hamachi list, and your host's computer will now be listed.
Step 5: Successful Connection Verification
After joining the network, verify the connection status:
-
Green Light: A solid green light next to a friend’s name indicates a successful P2P Direct Connection. This is the optimal status, offering the lowest latency and highest speed.
-
Blue Light / Yellow Exclamation Mark: If you see a blue light or a yellow exclamation mark (sometimes indicating "Relayed tunnel"), it means Hamachi could not establish a direct P2P link and is routing traffic through a LogMeIn Relay Server. The connection is still active but will have higher latency.
-
Game Launch: The host launches the multiplayer game and selects the "LAN" or "Local Network" option. The client connects using the host's Hamachi IP address (the 25.x.x.x address shown next to their name in the Hamachi interface).
Core Feature Review: Is It Truly "One-Click"?
The core reason Hamachi is widely praised lies in the perfect combination of its user experience and underlying technology. This section will provide a comprehensive review focusing on the three dimensions most relevant to users: ease of use, performance, and security, as well as the differences between the free and paid versions.
1. Usability Experience: The Seamlessness of Bypassing Port Forwarding
Although Hamachi's UI design is simple, the intuitive nature of its functional workflow is unparalleled.
-
Simplicity and Intuitiveness: The entire client interface features only three core operations: "Power On/Off Service," "Create a New Network," and "Join an Existing Network." The status of all network members is clear at a glance (via status lights and virtual IP addresses).
-
The Meaning of "One-Click": Hamachi's so-called "one-click" means that users can achieve NAT traversal without ever touching the router background, without manually setting firewall rules, and without worrying whether their Public IP is dynamic. Compared to the complex steps required by the traditional multiplayer connection method:
|
Traditional Port Forwarding Mode |
Hamachi Virtual LAN Mode |
Efficiency Comparison |
|
1. Log in to the router background (requires knowing IP and password). |
1. Register and log in to the Hamachi account. |
Setup Time |
|
2. Set the game host to a static internal IP. |
2. Create/Join a network (enter ID/password). |
❌ Traditional Mode takes 15-30 mins. |
|
3. Find and configure port forwarding rules (e.g., TCP/UDP 25565). |
3. Copy the virtual IP address assigned by Hamachi. |
✅ Hamachi takes 2 mins. |
|
4. Check or disable Windows Firewall. |
4. Start the game. |
Learning Curve |
|
5. Tell your friend your Public IP address. |
Traditional Mode requires networking knowledge, Hamachi has zero barrier to entry. |
2026 Game Compatibility Matrix: Optimizing Hamachi for Modern & Classic Titles
Simply connecting to a Hamachi network is often just the first step. Different games require specific port adjustments and protocol tweaks within the virtual network adapter to ensure a "Green Light" connection. Below is our verified 2026 compatibility table for popular titles:
|
Game Title |
Version / Platform |
Optimized Settings |
Compatibility Score |
|---|---|---|---|
|
Minecraft |
Java Edition (1.21+) |
Open Port 25565 in Windows Firewall for the Hamachi NIC. |
⭐⭐⭐⭐⭐ (Excellent) |
|
Command & Conquer: Red Alert 2 |
Yuri's Revenge (CnCNet) |
Requires UDP Patch; set "Network Card" in options to the Hamachi 25.x.x.x IP. |
⭐⭐⭐⭐ (Requires Patch) |
|
Terraria |
Steam / GOG |
Host via Port 7777; ensure "Automatic Metric" is disabled for the adapter. |
⭐⭐⭐⭐⭐ (Plug & Play) |
|
Counter-Strike 1.6 / Half-Life |
Legacy Build |
Use |
⭐⭐⭐⭐⭐ (Very Stable) |
2. Latency & Ping Reduction Guide: Achieving Green Light P2P Speeds
The value of a virtual LAN ultimately depends on its performance—whether the connection is smooth and the transfer is fast. Hamachi's performance is highly dependent on the type of connection it establishes.
Latency (Ping) Test
Latency is the core metric for evaluating the multiplayer gaming experience.
-
P2P Direct Connection (Green Light): This is the ideal state. Ping values are usually similar to direct connections to a public server, depending on the physical distance and network quality between you and your friend. For example, the Ping between two domestic locations is typically between 30ms - 80ms, which is perfectly adequate for most FPS and RTS games.
-
Relay Tunnel (Yellow Exclamation Mark/Blue Light): This is Hamachi's performance bottleneck. Since data must be rerouted through LogMeIn's relay servers, latency increases significantly. Ping values can spike to 150ms - 300ms. While this is acceptable for turn-based games or file sharing, the experience for shooters or racing games will be very poor.
Bandwidth Restrictions
This is the limitation that Hamachi free users must face.
-
Free Version Restriction: LogMeIn officially imposes strict bandwidth limits on free users. Although no specific Mbps value is officially announced, in practical testing, large file transfer speeds are typically restricted to between 100KB/s and 500KB/s. This makes it unsuitable for remotely transferring TBs of data or high-bitrate remote desktop sharing.
-
Paid Version Advantage: Paid subscription users enjoy full-speed bandwidth, limited only by their respective ISP's upload and download speeds.
3. Security and Privacy Protection
Security is crucial when transmitting data within a virtual LAN.
-
Encryption Protocol: Hamachi uses the industry-standard AES-256 encryption algorithm to protect all data transmitted within the tunnel. Whether it's a P2P direct connection or transmission via a relay server, the data is encrypted before leaving your computer, and only the recipient can decrypt it.
-
Data Flow Path and Privacy:
-
P2P Direct Connection: Data is transmitted directly between users. Hamachi only provides the connection and authentication service and cannot view or access your data.
-
Relay Connection: Data passes through Hamachi's relay servers for forwarding. However, because the data is end-to-end encrypted, the relay server itself cannot decrypt the content; it merely serves as an efficient "data mover." This means the user's chat logs, game data, and file contents are secure.
4. Hamachi Free Version Limitations: The 5-Person Cap and Bandwidth Throttle Test Results
Hamachi offers three core modes, but the primary choice for ordinary users is between the Free and Standard versions.
|
Feature |
Free Version |
Standard / Paid Version |
Applicable Scenario |
|
Max Network Members |
5 people/network |
32 people/network |
Small friend group multiplayer |
|
Number of Networks |
Unlimited |
Unlimited |
Personal multi-project use |
|
Network Mode |
Mesh |
Mesh/Hub-and-Spoke/Gateway |
Remote work/Server setup |
|
Bandwidth Limit |
Strictly Limited (Throttled) |
No Limit (Full Speed) |
Large file transfers, high-quality gaming |
|
Remote Configuration |
No |
Yes (Web backend management) |
Enterprise-level deployment and maintenance |
Conclusion: If your multiplayer group does not exceed 5 people and you do not frequently transfer large files, the Hamachi Free Version is perfectly adequate. If you require higher bandwidth and greater team capacity, you should consider upgrading to a paid subscription.
ULTIMATE FIX: Hamachi "Yellow Exclamation Mark" & Low Latency P2P Direct Connection Guide
The "Yellow Exclamation Mark" (YEM) is the most common and frustrating problem encountered by Hamachi users. It signifies that the connection has defaulted to the Relay Tunnel mode, sacrificing P2P direct speed for guaranteed connectivity. Fixing the YEM is equivalent to forcing a return to the optimal, low-latency Green Light status.
1. Understanding the Causes of the Yellow Exclamation Mark
The YEM appears when the two devices are unable to successfully complete the UDP Hole Punching process required for a direct P2P connection. This failure is almost always due to one of three barriers:
-
Windows Firewall / Third-Party Security Software: The most common culprit. The firewall, by default, blocks the incoming UDP packets required for the P2P handshake, forcing Hamachi to use the relay.
-
Symmetric NAT (Router Type): Certain types of routers (common in apartment complexes or high-security networks) use a strict form of NAT called Symmetric NAT, which is exceptionally difficult to traverse, making P2P impossible.
-
Network Adapter Priority Conflict: Windows prioritizes the physical network adapter (like your Ethernet or Wi-Fi card) over the virtual Hamachi NIC, leading to routing confusion.
2. Common Hamachi Error Codes and Simple Solutions
When installing or using LogMeIn Hamachi, users may encounter specific numerical error codes or recurring messages. Understanding what these codes mean can significantly speed up troubleshooting.
|
Error Code/Message |
Description of the Issue |
Simple Solution |
|
Error 256 |
The most common error. Indicates the LogMeIn Hamachi Tunneling Engine (service) is not running or has crashed. |
Open the Hamachi client, click the Power On button to restart the service. If it fails, restart your computer. |
|
Error 17 |
"Failed to connect to the LogMeIn Hamachi service." Often appears during startup, signaling a corrupted service or installation file. |
Clean Reinstall: Uninstall Hamachi, ensure all related folders (ProgramData\LogMeIn Hamachi, AppData\Hamachi) and registry keys are manually deleted, then reinstall. |
|
Error 2503 / 2755 |
Installation errors, usually during the final phase of setup. The installer does not have sufficient permissions to create a file or registry key. |
Run as Administrator: Right-click the Hamachi installer executable and select Run as administrator. |
|
"VPN connection failed" |
Occurs when attempting to power on the client or join a network. The system fails to utilize the virtual NIC. |
Re-enable NIC: Go to Control Panel > Network Adapter Settings. Disable the LogMeIn Hamachi Virtual Ethernet Adapter, wait 5 seconds, and re-enable it. Then restart Hamachi. |
|
"Could not parse status information." |
Indicates that Hamachi cannot read or write its configuration file, potentially due to disk errors or restrictive permissions. |
Check User Permissions: Ensure your Windows user account has full read/write permissions to the C:\Users\YourUser\AppData\Local\LogMeIn Hamachi folder. |
|
"Login failed" |
The client successfully connected to the LogMeIn server but the authentication failed. |
Check Account Credentials: Ensure you are using the correct LogMeIn account email and password, not the Hamachi Network ID and Password. |
|
Yellow Dot / Exclamation Mark |
(Not a code, but a major status issue). See Section 4. The connection is forced through a slower Relay Tunnel. |
Fix NIC Priority (Crucial): Set the Interface Metric of the Hamachi Virtual Adapter to a low value (e.g., 10) in the IPv4 Advanced settings (as detailed in Section 4.2 Fix 3). |
3. Comprehensive Fixes for the Yellow Exclamation Mark
Below are the systematic steps, ranked from easiest to most effective, to force a P2P direct connection.
Fix 1: Verify the Hamachi Service Status (The Easiest Check)
Ensure the Hamachi service is running correctly:
-
Open the Hamachi interface. The "Power On" button should be green.
-
Check for the assigned 25.x.x.x IP address next to your user name. If this IP is missing, the virtual NIC or service is likely malfunctioning.
-
Action: Try cycling the Power On/Off button. If the issue persists, proceed to the next fix.
Fix 2: Configure Windows Firewall and Exceptions (Crucial Step)
Even if Hamachi is listed as an allowed app, manual configuration is often required.
-
Open Windows Defender Firewall with Advanced Security.
-
Navigate to Inbound Rules.
-
Verify: Ensure that there are separate Inbound Rules for the Hamachi executable (hamachi-2-ui.exe and hamachi-2-svc.exe) that allow both TCP and UDP traffic for all profiles (Domain, Private, Public).
-
Action: If in doubt, temporarily disable the Windows Firewall entirely and test the connection. If the YEM disappears, re-enable the firewall and ensure the Hamachi rules are correctly configured.
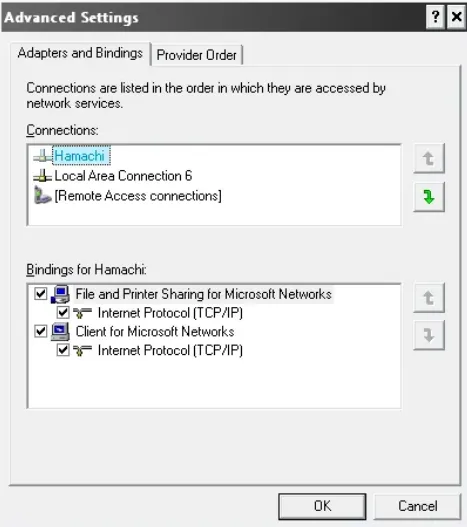
Fix 3: Adjust the Virtual NIC's Priority (The Ultimate Fix for Routing Conflicts)
This addresses the issue where Windows sends game traffic through the physical adapter instead of the Hamachi virtual adapter.
-
Open Control Panel -> Network and Sharing Center -> Change Adapter Settings.
-
Right-click the Hamachi network adapter (LogMeIn Hamachi Virtual Ethernet Adapter) and select Properties.
-
Select Internet Protocol Version 4 (TCP/IPv4) and click Properties.
-
Click the Advanced button.
-
In the "IP Settings" tab, uncheck the "Automatic metric" box.
-
In the "Interface metric" field, enter a low value, such as 10. (Lower values mean higher priority; default adapters are usually 20 or higher).
-
Click OK on all windows to save the changes.
-
Action: Restart Hamachi. The system will now prioritize routing traffic through the Hamachi virtual LAN, often instantly resolving the YEM and establishing P2P.
Fix 4: Router and UPnP Troubleshooting (Advanced)
If the connection status remains yellow after adjusting the firewall and NIC priority (Fixes 2 and 3), the root cause is almost certainly the router's internal network configuration or a restrictive ISP. This step involves advanced troubleshooting that may require logging into your router's administration interface.
Step 1: Enabling UPnP (Universal Plug and Play)
UPnP is a protocol that allows devices like Hamachi to automatically request and manage port forwarding rules on your router. If your router supports UPnP, enabling it can resolve P2P connection failures without manual intervention.
-
Access Router: Log in to your home router's admin panel (usually via 192.168.1.1 or 192.168.0.1).
-
Locate UPnP Settings: Search for settings labeled "UPnP," "Application & Gaming," or "NAT Passthrough."
-
Enable: Ensure the UPnP feature is enabled.
-
Test: Restart your Hamachi client. If UPnP successfully creates a dynamic rule, the connection should switch to Green Light (P2P).
Step 2: Manual Port Forwarding (Last Resort)
If UPnP is unavailable or doesn't resolve the issue, you can manually configure a static port forwarding rule for Hamachi's listening port. This is a final attempt to guarantee the P2P handshake can pass through the router's firewall.
-
Identify Hamachi Port: Check the UDP Port currently configured in Hamachi (System -> Preferences -> Settings -> Peer Connection). Use the default (e.g., 17771) or your custom port.
-
Set Static IP: Ensure your host computer has a static internal IP address (e.g., set up a DHCP reservation in the router).
-
Configure Port Forwarding: In the router's admin panel, create a new rule:
-
External Port: Use the Hamachi UDP Port (e.g., 17771).
-
Internal Port: Use the Hamachi UDP Port (e.g., 17771).
-
Protocol: UDP.
-
Target IP: The static internal IP of the host computer.
-
Note: This step only needs to be performed on the host's router.
Step 3: Checking for Symmetric NAT
If all steps fail, your network is likely behind a Symmetric NAT or a restrictive Carrier-Grade NAT (CGNAT) deployed by your ISP.
-
Symmetric NAT: This router type assigns a different public port for every new connection request, making UDP hole punching virtually impossible. Hamachi's P2P will fail, and you will be stuck in the higher-latency Relay Tunnel mode.
-
Action: If you suspect CGNAT, the only true solution is to contact your ISP and request a dedicated public IP address, or accept the performance limitation of the Relay Tunnel.
The "Nuclear Option": Resetting the Windows 11 Network Stack
If reinstallation fails, the issue likely lies deep within the Windows 11 network configuration. Follow these advanced steps to clear the path for Hamachi:
-
Reset the IP & Winsock Catalog: > Open Command Prompt (Admin) and run the following commands:
-
netsh int ip reset resetlog.txt -
netsh winsock reset -
Reboot your PC immediately. This clears corrupted routing tables that prevent the virtual adapter from assigning its 25.x.x.x IP.
-
-
Force-Start the Tunneling Engine: > Often, Windows 11 delays legacy services to speed up boot times.
-
Press
Win + R, typeservices.msc, and hit Enter. -
Find "LogMeIn Hamachi Tunneling Engine."
-
Right-click, select Properties, change the Startup Type to "Automatic," and ensure the Service Status is "Running."
-
Summary and Future Outlook
While LogMeIn Hamachi remains a powerful and user-friendly tool, the landscape of Virtual LANs is rapidly evolving. For users seeking higher performance or advanced security features, several modern alternatives are worth considering.
1. Hamachi's Strengths and Weaknesses
Hamachi's enduring popularity is rooted in its unique balance of simplicity and functionality, but it is not without its limitations, particularly in the free tier.
Strengths (Advantages)
-
Zero-Configuration Setup: Effortlessly bypasses the complex steps of traditional port forwarding and NAT configuration.
-
High Compatibility: Excellent support for legacy games (e.g., Warcraft III, CS 1.6) that rely on older network protocols.
-
Reliable Tunneling: Guarantees connectivity through its Relay Server fallback, ensuring communication even in highly restrictive network environments (e.g., corporate firewalls or strict NATs).
-
Security: All data transmitted within the virtual network is protected by AES-256 encryption.
Weaknesses (Disadvantages)
-
Strict Free Tier Limits: The free version is limited to a maximum of 5 members per network, hindering larger multiplayer groups.
-
Bandwidth Throttling: Free users experience severe bandwidth restrictions (typically 100-500 KB/s), making high-bitrate streaming or large file transfers impractical.
-
High Relay Latency: When P2P fails (the "Yellow Exclamation Mark" state), the connection switches to the Relay Tunnel, resulting in high latency (150ms-300ms) which severely impacts real-time gaming performance.
-
Symmetric NAT Issues: P2P direct connection often fails when users are behind a Symmetric NAT, forcing them into the slower Relay mode.
2. Hamachi Alternatives 2026: Why ZeroTier and Tailscale Are Gaining Popularity
-
ZeroTier: Uses a Mesh networking architecture, functioning like a single global switch once installed. It offers near zero-configuration setup and generally provides lower latency than Hamachi, making it an ideal high-performance Hamachi alternative.
-
Tailscale: Built on the WireGuard protocol, focusing on security and ease of use. It offers deeper integration with operating systems and provides robust authentication and access control features, making it more suitable for remote work and enterprise applications.
-
Radmin VPN: Similar to Hamachi, this is a traditional centralized virtual LAN tool, but its free version often has a higher user capacity limit, earning it a good reputation among user groups in certain regions.
The 2026 VPN Battle: Why Gamers Are Switching to Mesh Networks
In 2026, while Hamachi remains a household name, modern alternatives like ZeroTier and Tailscale have gained massive traction due to their Mesh VPN architecture. To provide an objective review, it is crucial to compare these tools based on the current year's technical standards:
|
Feature |
LogMeIn Hamachi |
ZeroTier |
Tailscale |
|---|---|---|---|
|
Architecture |
Hub-and-Spoke (Centralized) |
P2P Mesh Network |
P2P Mesh (WireGuard) |
|
Ease of Use |
⭐⭐⭐⭐⭐ (Join ID logic) |
⭐⭐⭐ (Requires ID + Auth) |
⭐⭐⭐ (Account based) |
|
Latency |
Medium (Relayed Tunnels) |
Low (Direct P2P) |
Lowest (WireGuard) |
|
Device Limit |
5 (Free Version) |
25 (Free Version) |
3 Users / Unlimited Devices |
- Ease of Use: Hamachi’s "Join ID" logic is still the most beginner-friendly for non-technical users. It mimics a traditional lobby system, making it the preferred choice for casual Minecraft or small LAN parties.
- Performance: WireGuard-based tools like Tailscale offer significantly lower latency and higher throughput because they establish direct peer-to-peer connections. However, the setup complexity (managing nodes and authentication keys) often deters "non-techies" who just want a one-click solution.
3. Future Trend Predictions
-
Widespread Adoption of Mesh Networking: The traditional centralized (Hub-and-Spoke) model will gradually be replaced by Mesh Networks. Mesh allows all devices to connect directly, offering more connection paths and higher fault tolerance.
-
Zero Trust Networks: Future virtual networks will incorporate stricter access controls. Devices and users will require continuous identity verification rather than solely relying on network boundaries.
-
Integration of High-Performance Protocols: More services will adopt high-performance, low-overhead VPN protocols like WireGuard to minimize latency caused by encryption and transmission.
4. Conclusion
LogMeIn Hamachi remains the preferred tool for connecting older games and quickly setting up temporary networks. However, for users pursuing maximum performance, high team capacity, and unified cross-platform networking requirements, newer generation Mesh tools like ZeroTier or Tailscale should be considered.
How to Optimize Hamachi for Zero-Lag Gaming (VLAN Setup)
Even after fixing the "Yellow Triangle," you might still experience high ping or lag in games like Minecraft, Terraria, or older LAN titles. Follow these 2026 optimization steps to ensure your Virtual LAN is running at peak performance.
1. Prioritize the Hamachi Network (Interface Metric)
Windows often gives your physical Wi-Fi or Ethernet priority over the Hamachi virtual adapter, causing "LAN games" to fail to see your friends.
-
Go to Control Panel > Network and Internet > Network Connections.
-
Right-click Hamachi > Properties > Internet Protocol Version 4 (TCP/IPv4) > Properties > Advanced.
-
Uncheck "Automatic metric" and enter 10 in the "Interface metric" box. This tells Windows to treat Hamachi as a high-priority highway for gaming traffic.
2. Disable IPv6 for the Hamachi Adapter
Many modern games struggle with IPv6 over a virtual tunnel. Disabling it on the Hamachi adapter specifically can prevent "Peer not reachable" errors.
-
In the same Hamachi Properties menu, uncheck Internet Protocol Version 6 (TCP/IPv6). Note: Only do this for the Hamachi adapter, not your main internet connection.
3. Adjust Encryption Settings (For Trusted Friends Only)
Hamachi encrypts all traffic by default, which adds a slight processing delay (latency). If you are playing with trusted friends on a private network, you can reduce this overhead.
-
In the Hamachi app, go to System > Preferences > Settings.
-
Under Peer Connections, change "Encryption" to None or Disabled.
-
Warning: Only do this if you trust everyone in your network, as your gaming traffic will be unencrypted.
4. Fix MTU Mismatch
If you can see the game lobby but can't join, it’s likely an MTU (Maximum Transmission Unit) issue. Setting Hamachi's MTU to 1400 often resolves packet fragmentation issues that lead to "Connection Timed Out" errors.
How to Completely Uninstall Hamachi (Windows 11 Ultimate Guide)
A complete uninstallation of Hamachi requires more than just removing the main application. You must also clean up all remnants of the virtual network adapter, configuration folders, and registry keys to prevent future network conflicts and issues.
Step 1: Standard Program Uninstallation
-
Open Settings > Apps > Installed apps (or Apps & features).
-
Locate LogMeIn Hamachi in the list.
-
Click the three dots (or right-click) and select Uninstall.
-
Follow the prompts to complete the standard uninstallation process.
Step 2: Remove Residual Virtual Network Adapter (NIC)
If the virtual network adapter remains after the standard uninstall, it can lead to network failures or conflicts.
-
Open Device Manager: Type "Device Manager" in the Windows search bar and open it.
-
Expand the Network adapters list.
-
Locate and right-click on the LogMeIn Hamachi Virtual Ethernet Adapter.
-
Select Uninstall device.
-
In the confirmation dialog, check the box that says "Attempt to remove the driver software for this device" (if the option is available).
-
Click Uninstall.
Step 3: Delete User Configuration Data and Cache Residuals
These hidden folders contain old logs, configurations, and cache files that must be manually cleaned up.
-
Delete User Configuration Data:
-
Press Win + R, type %appdata% and press Enter.
-
Delete ProgramData Cache:
-
Navigate to C:\ProgramData\ (this is a hidden folder, you may need to enable viewing hidden items).
-
Delete the folder named LogMeIn Hamachi.
Step 4: Clean Up Registry Residuals (Optional, Advanced)
Warning: Modifying the registry carries risks. Proceed with caution and consider backing up your registry before attempting this step.
-
Open Registry Editor: Press Win + R, type regedit and press Enter.
-
Search for Residual Keys: In the Registry Editor, use the search function (Ctrl + F) to search for the keywords Hamachi or LogMeIn Hamachi.
-
Delete Relevant Keys: Find and delete all keys pointing to Hamachi. Focus primarily on the Hamachi-related subkeys within these paths:
-
HKEY_LOCAL_MACHINE\SOFTWARE\LogMeIn Hamachi
-
HKEY_CURRENT_USER\Software\LogMeIn Hamachi
-
Final Step: After completing all the steps above, reboot your computer. Hamachi will be completely removed from your Windows 11 system.
Frequently Asked Questions (FAQ)
In the process of using Hamachi, you may encounter several frequently recurring questions or issues that require clarification. Below are the most common Q&A items we have compiled to help you quickly resolve your queries.
Q: How many people can join a single Hamachi Free Network?
A: The Hamachi Free version has a strict limit of 5 members per single network (including the network creator).
Tip: If your gaming group exceeds 5 people, you will need to upgrade to the paid Standard or Premium version.
Q: What does the "Yellow Exclamation Mark" or Blue status light mean?
A: This status indicates that Hamachi could not establish a fast P2P (Peer-to-Peer) Direct Connection between you and the other user. The connection has been routed through a slower Relay Tunnel via LogMeIn's servers, which results in higher latency (typically 150ms-300ms) and can negatively impact real-time gaming.
Q: Does the Hamachi Free version have a speed limit (bandwidth throttle)?
A: Yes. The free version imposes a strict bandwidth throttle, typically limiting speeds to between 100 KB/s and 500 KB/s. This is done to encourage upgrades. If you need to perform high-bitrate streaming or large file transfers, the paid version is required.
Q: Can Hamachi be used for applications other than gaming?
A: Absolutely. Hamachi creates a general-purpose Virtual LAN (VLAN). Common non-gaming uses include: establishing a secure tunnel for Remote Desktop Protocol (RDP) access, accessing home NAS/shared drives, and hosting small, private FTP or web servers.
Q: Is Hamachi secure? Is my data safe if it passes through a Relay Server?
A: Yes, Hamachi is secure. All data transmitted within the virtual network is protected using AES-256 encryption (an industry standard). Even when the connection uses the Relay Tunnel, the data remains encrypted from end-to-end, meaning the relay server cannot decrypt or read the content of your communications.
Q: Can Hamachi be used for applications other than gaming?
A: Yes. LogMeIn Hamachi is fundamentally a Virtual LAN (VLAN) tool, and while it gained fame in the gaming community, its true power lies in its versatility as a secure remote access solution for both professional and personal networking tasks that require bypassing NAT restrictions.
Beyond the Game: Key Non-Gaming Applications
-
Remote Desktop Protocol (RDP) Access: Hama
-
chi eliminates the need for manual port forwarding, allowing RDP software (like Windows' built-in Remote Desktop Connection or VNC) to treat the remote machine as if it were on the same physical network, provided both machines are logged into the same Hamachi network.
-
Remote File Sharing and NAS Access: You can securely access network-attached storage (NAS) devices, shared folders, or network drives on a remote Hamachi-connected PC. This is ideal for secure file retrieval, backups, and collaborative document work without exposing your local network resources to the public internet.
-
Private Server Testing/Hosting: Developers, IT staff, or small businesses can use Hamachi to privately host and test web, database, or media servers among a small, authenticated team, using Hamachi's virtual IP addresses instead of configuring complicated public domain routing.
Using Hamachi IP for RDP Connections: Hamachi creates a secure tunnel by assigning a dedicated 25.x.x.x IP address to each connected device. To initiate a secure Remote Desktop session, simply open your RDP client (e.g., mstsc.exe) and use the remote machine's Hamachi IP (the 25.x.x.x address) instead of its local or public IP. To ensure RDP traffic is prioritized and fast, go to the Hamachi System -> Preferences -> Settings menu and manually set the UDP Port to a common, open value like 55000 for all users in the network, boosting non-gaming utility traffic.
PS: All images in this article are sourced from the merchant's official website and are copyrighted by the merchant.